Tuesday, April 26, 2011

The Thumb is Still Green!

As you may remember, I bought three different flower/plant kits while I was in Chicago at the Bishop International Show.  On Sunday night, I decided to tackle the palm kit I purchased. 

This kit was created by Jan van den Doel of Holland.  He was very nice at the show and was great to help point me towards kits that were more beginner oriented so I wouldn't get frustrated.


Below is everything that was included in this kit.  The major difference between this kit and the Parlor Fern I did earlier in the week was that this one came with laser cut palm fronds instead of me having to cut them.  I was happy to see that as I really wasn't ready to spend so much time cutting again that night. :-)  Also included was a small pot, wire for the stems and a small bit of brown paper.  I had to supply the clay for the pot as well as glue, paint and dried coffee grounds for the dirt.

 To give you a better idea of the size of the palm fronds, I'm holding one of the largest ones on my fingers.  You can see the detail on them.  There were 12 total.  The wire came in four pieces and you had to cut each wire into thirds so you would have enough stems to complete the plant.  It was easy enough to cut the leaf away from the main paper.

Honestly, I think the next step was the hardest.  You had to apply a small amount of glue to each wire and then carefully glue it down the center of each palm frond.  Below you can see two completed ones from the top and the one on the far right is showing what it looks like on the bottom.  You do this to each of the twelve supplied leaves.

Now it was time to color them leaves.  My original thinking was to use a thinned down paint as I did on the fern, but I had another idea.  I had recently purchased a set of 100 markers that are acid free.  I choose a couple different shades of green and got to coloring each frond.  On a few of the fronds I used a lighter shade on the tips and I even used a light tan on a few so that it would have some natural coloring. I have never owned a palm that didn't get some dead spots on the leaves.  When it comes to plants that are real and not made of paper and wire, my thumb turns a deep shade of brown and I have a bad habit of killing them. :-(  Poor houseplants start shaking and crying as soon as I bring them into my house.  One day I will stop trying and needlessly killing innocent plant life.  

I forgot to take a photo of the next step so I'm going to explain it to you and you can see the end result in this picture.  After all your fronds have dried and you are happy with the color, take two or three pieces and wire them together at the base. Then you tear off a small piece of the brown paper, put some glue at the bottom of the bundle of stems and wrap the paper around it.  The reason I said to tear the paper is because it gives you a rough edge as opposed to a clean, straight cut.  As you see in the picture below, it does give the impression of multiple stalks growing from one clump...just like real life!

Once you have done all your bundles, fill the pot with some florist clay, top with a layer of glue and sprinkle on your dried coffee grounds.  Then you press each bundle through the glue into the clay and let dry.  Once I had inserted all my bundles, this is what I had. While happy, I couldn't wait to start shaping the fronds. However, I was a good boy and waited until the glue had dried. 

Here you have the finished product.  I'm happy with it.  I even bent one of the small fronds a bit extra so it has the look of a real plant in my house. HA HA

I really enjoyed doing this kit.  I found it much easier than the first one as there are fewer steps and far less cutting.  If you are looking to do a first plant, I would really recommend this.

I hope you have enjoyed my latest adventure and I thank you for taking the time to read my blog and see what I have been doing.
Till later!

Saturday, April 23, 2011

I Find my Green Thumb...The Parlor Fern

Some of you may remember that I purchased 3 different plant/flower kits while I was in Chicago at the Bishop International Show.  Well, I had some time today between loads of laundry to finally get to play with one of them.  I thought the first one I would tackle was the Parlor Fern.  I had planned on dividing the kit into two smaller plants but once I got started I just couldn't stop and now I'm going to have a heck of  a time finding a spot for this sucker, but I'm sure happy with how it turned out.  This is my first plant kit.

This particular kit was made by Kimberly Hammer of Ambrosia (cost, $20).

Here is everything that came in the kit.  It included a small gold pot (not the one pictured on the cover of the kit, but a nice ceramic pot anyway), a small amount of florist clay, some dried coffee grounds, a stack of ready to cut/paint leaves and a finished leaf as an example. 

The first step according to the directions was to paint the leaves, but I decided I wanted to cut them into a spear shape first so I could make sure to get paint on the edges of the leaves as well. Now that I have completed the kit, I don't think the initial cutting makes any difference if you do it before or after painting.  I used two different shades of green as well as a little black.  As you can tell, I mixed some up and left a big puddle of various shades of green on my lid.

This is one of the leaves while I was painting it.  I was really sloppy as she suggested and made sure to also paint the stems.

As I painted each leaf, I stuck it into a piece of foam to dry.  Here is a picture of all my little leaves, stretching to get some sun near my back door.  They look like happy little leaves to me.

After the leaves were good and dry, the next step was to cut each leaf into tiny little strips to look more like a fern and less like spears. :-)  OK.  After finding my tiny embroidery scissors I started cutting.  Then I cut some more.  Then I had lunch.  Then I cut some more and finally I cut more.  PHEW! There are a lot of cuts on those 20 leaves. As I progressed, I got better at it so I hopefully was able to hide some of the beginner leaves in the "back" where they wouldn't be seen. HAHA

The next step is to take the container you are using and fill it with florist clay.  On top of that you spread a thin layer of white glue (I used Tacky Glue) and then sprinkle the dried coffee grounds on top to look like dirt.  I'm using the little Celadon Elephant planter I also purchased at Bishop. I'm liking the look so far.

After you get the "dirt" sprinkled on and pressed down into the glue, you have to start inserting the leaves into the planter.  You start with the largest and work your way down to the smallest leaves, spacing and turning the plant as you insert.  After I got all the leaves pushed down into the planter, I shaped them up to make them look a bit more natural and ruffled up the leaves a bit so there was some "movement" to them.

I'm happy with how it turned out.  Now I have to figure out where I'm going to put this thing. HAHA  It sure doesn't fit where I had planned, but isn't that part of the fun of doing miniatures? 

I think my next project will be the palm I purchased.  that kit is different from this one and features laser cut leaves.  I'm curious to see how it turns out.

Till later!

Tuesday, April 19, 2011

Bob Off Video good for INSPIRATION!

I've been doing some surfing around on YouTube.  It is just one of my many addictions. HAHA  Who would have ever thought you could spend an entire evening watching videos made by others on a computer instead of sitting in front of a television.  Times sure have changed haven't they?

Anyway, I digress.  YouTube is full of videos about miniatures.  While cruising around and looking at some of the many, I found a video made by Bob Off.  In this video he describes how he takes some plans on paper to a finished room.  Great to watch for inspiration and you might even learn a thing or two...I know I did.  He has only posted two videos (one below) and maybe we can get him to make some more. Very talented person.

I hope you enjoy it.


Till later!

Monday, April 18, 2011

A Couple Previous Projects

Hello again everyone.  Were you worried that I would disappear for a while after getting all those pics from Chicago posted? Nope, I'm here.

As some of you are aware, I recently lost my mother and while I was up home for the services, I found a couple projects that I had made for her as a Christmas Gift and a Mother's Day Gift a while back.  As sad as it was to have to bring them home, I'll always have them as a great memory.

When I was growing up, Christmas was always a big deal in our house. After Thanksgiving was done and December was rolling around, Mom and I would start pulling out the Christmas decorations.  Mom was a classic decorator and she felt Christmas was elves, shiny ornaments, snow and toys.  For Christmas one year, I made a couple elf dolls and placed them inside a trunk full of decorations.  My thought being, they were about to start decorating the large snow covered tree behind them.  She told me the little mischievous one in the trunk reminded her of me when I was smaller.  I loved the tinsel and I was really good at getting it tied up in knots.  I love the way the elf in the front is sitting there patiently (or not) while the smaller elf gets untangled.  I need to find a dome or creative box to put this in so it stays pretty.


No anyone that knows my mom would know just how much like her this next project is.  My mom grew up in a small house on the side of a mountain in Virginia. She was a true country girl from the top of her head to her toes.  She used to talk about bringing water in from outside and putting it in the sink.  Everything in this project says MOM.  Growing up there were always African Violets on the window sill in our kitchen.  In the summer, tomatoes were grown and canned so we would have fresh tomatoes all year long till next summer. I remember well the speckled pot she would cook in and the small "hen in a basket" that she spoke fondly of from when she was growing up.  To this day if you open up a cabinet in her kitchen, there are TONS of pots and pans.  I'm not sure why she had so many, but we were never short of something to cook in or serve dinner in.  I can almost smell the breeze through the window while she cut up tomatoes for canning.


Thanks everyone for letting me do a bit of remembering.

Till later!

Sunday, April 17, 2011

The rest of my Chicago purchases and some other stuff

OK, before I even begin this post, can I just say how hard it can be to come up with something cute and playful for a post title?  As I'm sure you can tell, I'm losing that battle. HAHA

Now, on to more fun stuff.

Victoria was really hoping I could get a picture of the witches cave that was put into that large encyclopedia I discussed on my last post.  Well, you are in luck. I was able to clean up the picture and even though it is hard to see what all is in it (You looked down into it like you were looking down through the roof), I think you'll get an idea of what the artist was trying to do. 


I promised I would finally post pics of my purchases from Sunday and here they are.  As you can tell, I didn't go crazy buying things. That isn't what this trip was about, besides, I'm poor right now. :-)  I saw a lot of things I wished I had been able to purchase, and there were many promises to the vendors that if I won the lottery that Saturday night, I would be back.  Of course, not a single number matched on our lottery tickets, but we still had a great time.  Now, should that lottery win every come through, there will be much purchasing. HAHA

This is just a group shot of Sunday's purchases.  I purchased the Palm kit from Jan Van den Doel of Holland.  I can't wait to put this kit together. Madam Aspen needs some green in her roombox and this is one of three flower kits I purchased.  I've never done a flower kit before so I'm sure I'll be posting about my progress on it when I put it together.  The four small resin lion heads I thought were just really cute and I'm not sure what I'm going to do with them yet. I think they are going to end up in the next roombox.  Details to come when I'm done planning it. 

From Grapevine (http://www.grapevineminiatures.net/) had some great bottles.  They are the same people I purchased the nice basket and two grapevine wreaths from on Saturday.  Every good metaphysical shop needs lots of fun bottles.  The tall one on the back will need a stand and the hook in the cork will have to go as well, but could be really fun sitting on a counter filled with something.

Bear Limvere of Standing People Designs (http://www.standingpeopledesigns.com/) does some of the most amazing wood turnings I have ever seen and they really specialize in some unique and rare woods.  His wife does great burning and art on some the vases as well. The vase below is made from White Ebony is hollow, just as a vase should be.  It stands just at an inch tall.  I'm going to be doing a dried hydrangea arrangement in it. This will be used in the back "hall" of my roombox and should look great through the doorway.  I love the play of wood tones in the piece. You can ask Bear and his wife Alisa about how long it took me to finally pick this piece. There were quite a few that I was pondering, but I went back to this one a few times. The shape was just perfect and the colors work really well in that hall. I think some "dried" flowers will look great in it.

The little guy below isn't anything super special, but I LOVED the pose and attitude he is giving. I'm going to repaint and flock him.  I have plans for this little guy.  I'm not going to tell you what they are now because I want it to be a surprise. 

Hope you enjoy the rest of my purchases.  Nothing too terribly exciting, but they sure are to me. I can't wait to actually start accessorizing The Mystic Path. 

I mentioned my next roombox and you have no idea how hard it is for someone like me to not get started on it already. I have to FORCE myself to stick with one project. I just don't have the space to start something else before I complete the current one.  I already have an unfinished dollhouse sitting in my spare room begging for me to work on it. 

Oh so many projects, oh so little time. HAHA!  I laugh, but I'm sure you can all sympathize with me.  I know how y'all are...you are in the same boat as me.

Till later!

Saturday, April 16, 2011

Could it be? Yep, the last of Chicago pictures.

Well folks, it is time to post the last of the pictures I have from Chicago. 

I'm sure I have said it before, but humor me and let me say it again...this was one of the most soul inspiring trips I have ever taken.  It will never take the place of the first time I went. When you have never been and suddenly you are hit with such a huge display of creativity, it is awe inspiring. The difference between the first time and this time was that I took the time to really speak with the creators of these minis on this trip.  One of the things that you quickly realize is that all the people you have followed and watched for years are just like you. They are creating miniatures becasue it is their passion.  These people are lucky enough to be able to spend their days crafting these little bits of art for a living (at least a lot of them do) and when you look at the items they have created, it dawns on you that their intense love of this craft allows them to dream up and produce items of pure joy.  They love to talk about their art. You can speak about miniatures and they know what you are talking about. Not one time that weekend did I feel I was talking to a group of blank faces. To be able to spend two days talking minis and having a receptive audience is great.

There is no way I could ever list everyone that I spoke to or showcase all the works that I saw. Some of the things are so beautiful you could almost cry.  I hope that over the last week I have given you a lot to look at and enjoy.

Now it is time for what you are really wanting to see....more pictures.  Some of these artists I can't remember, but I wanted you to see some of the other things I saw.

This roombox was being sold to benefit the people of Japan.  100% of the sales price went to the Japan Relief Fund.  There are many artists represented here and the box was designed by Jo from Spencer's nook. (http://www.spencersnook.com/)

Sorry for the glare in this picture, but photographing through glass in a ballroom is challenging to say the least. This 1" scale box featured Merlin's room with a secret passage behind the bookcase, a great view out the windows and many fun magical items. 

Yep, this is Merlin's workshop in a teacup. What a creative idea!

It is true, your eyes are not deceiving you.  This dollhouse is completely stick-built like a true house. The details were amazing the inlaid floor in the following picture was stunning. 

 The brick work on this store front was absolutely amazing.

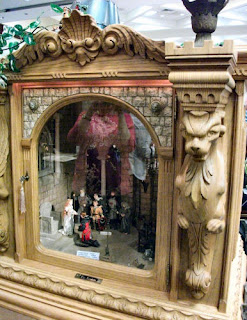
Love this witch and wish the other picture I took had turned out.  The "box" beside her to the left was actually a large encyclopedia that had been hollowed out and features a cave with lots of crystals, bats and other "witchy" things.

This roombox was made by Robert Dawson of The Model Room (http://www.themodelroom.com/) and he was nice enough to take the glass off the front so I could get some great pictures of it.  The small nook in the back was the perfect place to sit and take in the scenery. It was another one of those "crawl inside and sit a while" displays. WOW!


I sure hope you have all enjoyed my little pictorial journey through the show.  I still have to take pictures of teh miniatures I bought on Sunday before I left Chicago, but perhaps I'll get those done today and can share those tomorrow.

Till later!

Thursday, April 14, 2011

Still more Chicago....Ron Hubble & JL Signature Homes

I'm so glad that everyone is enjoying all the pictures.  It is hard to believe that tomorrow will be a week since I first flew to Chicago.  Time is flying by so quickly.

Some of you were wondering just how large The Accolade roombox was...well here is a picture of the exterior.  Sorry it isn't the best picture and it still doesn't show a good scale, but remember that the dolls are about 6 inches tall and you get a really good idea of the size. 

Oh, and curious as to just how big this show really is?  Well here are a few pictures showing the three different rooms.  I couldn't get the whole rooms because they are huge, but this should give you an idea of just how many people are at this show.  This show represents 230 exhibitors from 34 US States and 17 countries. WOW!! That is a lot of minis, and my feet felt like I had toured the globe at the end of the day on Saturday.


Now...how about some more pretty pics to look at.  In the hall outside the showrooms were two large dollhouses done by JL Signature Homes (don't have a website).  Talk about some craftsmanship.  The first home was called The Helmrich.
 OK...just look at that staircase in the foyer.  You still have your drool napkins from last night? They might come in handy here.

 The trim work in the rooms was equally as impressive.

The second house by them was The Brandywine.  This house has one of the most amazing central stairways I have ever seen in a dollhouse.  Sigh...so pretty.  Me want!!


Many of you may be familiar with Ron Hubble (http://www.ronhubble.com/index.html).  He makes some beautiful custom furniture and his fabrics are always the best.  Here are a few roomboxes and displays he had set up.  Such pretty eye candy.  I spent a lot of time with my hand over my mouth looking at all these minis.  If I hadn't covered my mouth, I'm sure something would have flown right on in there. Most of my time was spent with my mouth open in amazement.


I'm off to look at pictures, clean up some more to share and remember all the fun I had in Chicago.  Tomorrow will be my last official blog post about this trip, but I'm sure I'll have more to share as I think of things.

Till later!